Wind Relieving Yoga Pose: Full Guide to Pavanamuktasana
The wind relieving yoga pose, known in Sanskrit as Pavanamuktasana, is a supine yoga pose that uses gentle abdominal compression to stimulate digestive movement, release trapped intestinal gas, and decompress the lumbar spine. Practice it correctly and it delivers measurable relief for bloating, lower back tension, and digestive sluggishness in a single two-minute sequence.
According to the National Center for Complementary and Integrative Health, yoga-based interventions for gastrointestinal discomfort, including poses that compress and release the abdominal cavity, have shown positive effects on bowel regularity and patient-reported digestive comfort in multiple clinical reviews. This is not a folk remedy dressed up in wellness language. There is a real physiological mechanism at work.
This guide covers the exact technique, the biomechanical reasoning behind left-knee-first sequencing, modifications for seniors and pregnant practitioners, contraindications, hold times, Bikram context, and a complete gas-relief sequence. Every section is written to help you practice this pose accurately and safely.
Wind Relieving Yoga Pose: What It Is and Why It Works
The wind relieving yoga pose is a supine compression pose in which one or both knees are drawn toward the chest, creating direct pressure against the abdominal organs and stimulating intestinal motility through mechanical compression and release.
The name says exactly what the pose does. “Wind” in this context refers to intestinal gas, not air. The compression of the thigh against the abdomen creates a gentle squeezing effect on the ascending and descending sections of the large intestine. When you release the compression, the intestinal wall rebounds, which helps move trapped gas along the digestive tract.
This is one of the few yoga poses where the physical mechanism is straightforward enough to explain without speculation. The abdomen is compressed. The gut responds. Gas moves. The lumbar spine, freed from the weight of an extended leg and gently pulled into slight flexion, simultaneously decompresses. Two different systems benefit from one simple shape.
The pose works best when practiced slowly, with breath awareness, and with enough time in each position for the body to respond. Rushing through it misses the point. Think of it less like a stretch and more like a gentle internal massage that requires time to take effect.
Key benefits at a glance:
- Relief from intestinal gas and abdominal bloating
- Gentle decompression of the lumbar spine and sacroiliac joint
- Passive release of the iliopsoas and hip flexors
- Stimulation of the vagus nerve through diaphragmatic breath during the hold
- Parasympathetic nervous system activation through stillness and compression
Pavanamuktasana: Sanskrit Name, English Name, and Yoga Context
Pavanamuktasana comes from three Sanskrit roots: “pavana” meaning wind or air, “mukta” meaning release or freedom, and “asana” meaning pose or seat. The combined meaning translates directly as Wind-Releasing Pose or Wind-Removing Pose.
Both English names are correct. “Wind-Relieving Pose” is used in most contemporary Hatha and Vinyasa yoga settings. “Wind-Removing Pose” is the term used in the Bikram and 26&2 traditions, where the pose appears in the floor series with specific sequencing instructions. The Sanskrit name and the physical pose are identical across both naming conventions.
In classical Hatha yoga, Pavanamuktasana appears as a foundational supine pose accessible to students of all levels. It is frequently included in beginner sequences, therapeutic yoga programs, and restorative practices. In the Bikram / 26&2 system, it is pose number 12 in the floor series, practiced bilaterally before moving into the double-knee version.
The pose also carries significance in the Ayurvedic and classical yoga framework as a practice for regulating apana vayu, the downward-moving energy in the body associated with elimination, reproduction, and the release of what the body no longer needs. Whether you work within that framework or purely biomechanically, the pose functions the same way.
Pose Tip:
- The Sanskrit pronunciation is: pah-VAH-nah mook-TAH-sah-nah
- Common misspelling: “Pawanmuktasana” is an alternate transliteration, not an error
- First-time practitioners: focus on the physical mechanics before exploring the breathwork layers
How to Do the Wind Relieving Pose Step by Step
The wind relieving pose is practiced lying on your back on a firm, flat surface. A yoga mat provides adequate cushioning for most bodies. Add a folded blanket under the head and neck if the floor feels hard against the back of your skull.
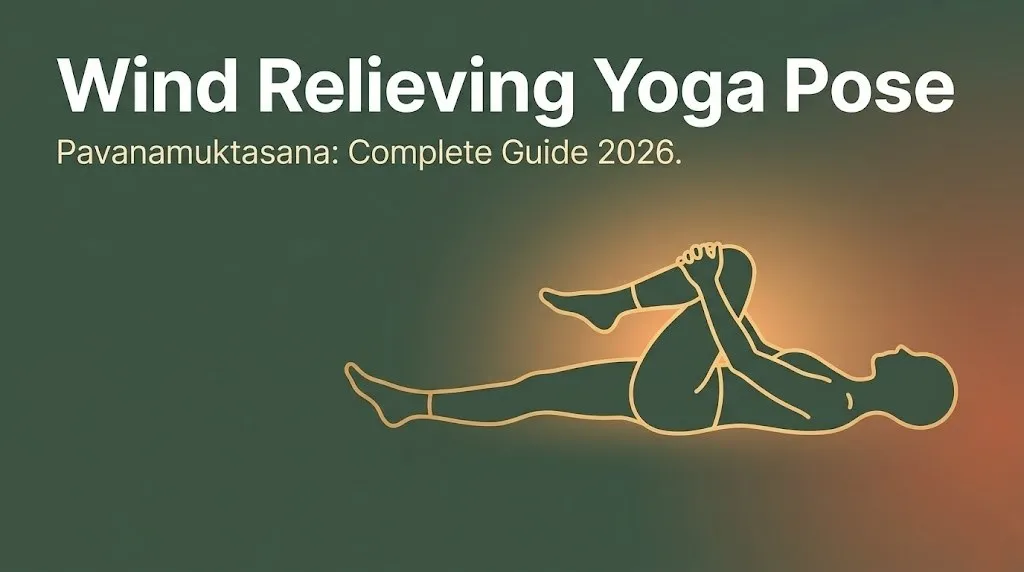
To practice Pavanamuktasana (Wind-Relieving Pose):
- Lie flat on your back with both legs fully extended, arms alongside the body, palms down.
- Press the back of the left leg firmly into the floor. This is the anchor leg throughout the single-knee version.
- On an exhale, draw the right knee toward the chest. Interlace your fingers just below the right kneecap, not on top of it, to avoid compressing the knee joint.
- Gently press the right thigh against the lower right abdomen. Apply firm but comfortable pressure.
- Keep both shoulders flat on the floor. Do not allow the right shoulder to lift toward the raised knee.
- Hold for 5 to 8 breath cycles, approximately 30 to 45 seconds, breathing slowly and fully through the nose.
- On an exhale, release the right leg. Extend it back to the floor fully before switching sides.
- Repeat on the left side, holding for the same duration.
- After completing both single-knee versions, draw both knees toward the chest simultaneously for the double-knee variation. Hold for 5 to 8 breath cycles.
- Release both legs slowly on an exhale. Rest in Savasana (Corpse Pose) for three to five breaths before continuing.
Modification for beginners: if interlacing fingers below the knee feels unstable, use a yoga strap looped around the back of the thigh. This gives a secure hold without requiring hand strength or shoulder flexibility.
Modification for tight hips: if the thigh does not reach the abdomen comfortably, stop where the hip feels a gentle pull. Do not force the knee deeper. The compression benefit begins with any degree of thigh-to-abdomen contact.
Single Knee vs Double Knee Wind Relieving Pose
The single-knee version of Pavanamuktasana and the double-knee version are distinct variations with different effects on the body, and practicing both in sequence produces the most complete result.
The single-knee version targets one side of the large intestine at a time. The right knee draws toward the right side of the abdomen, compressing the ascending colon, which runs upward on the right side of the body. The left knee targets the descending colon, which runs downward on the left. This is why yoga teachers trained in classical Hatha and the Bikram tradition teach the right knee first in some lineages, and the left knee first in others. The left-first approach follows the natural direction of colonic transit from ascending to transverse to descending, which is addressed in detail in the following section.
The double-knee version compresses both sides of the lower abdomen simultaneously and also creates a gentle rocking motion when used dynamically. This version tends to produce a stronger sensation in the lumbar spine because the pelvis tilts more fully into posterior tilt with both legs raised.
| Variation | Primary Target | Lumbar Effect | Abdominal Effect | Best For |
|---|---|---|---|---|
| Right knee single | Ascending colon, right hip flexor | Mild decompression | Right-side abdominal compression | Right-side gas or hip stiffness |
| Left knee single | Descending colon, left hip flexor | Mild decompression | Left-side abdominal compression | Left-side gas or hip stiffness |
| Both knees together | Full lower abdomen | Stronger lumbar flexion | Bilateral abdominal compression | General bloating, back tension |
| Dynamic rocking | Full lower abdomen | Gentle lumbar massage | Rhythmic compression-release | Chronic constipation, tight back |
Modification for knee sensitivity: in the single-knee version, keep the gripping hands below the kneecap rather than on the kneecap. If the knee feels uncomfortable under direct pressure from the arms, use a strap around the back of the thigh instead.
Key Takeaway: Practice the right knee first, then left knee, then both together, in that sequence. Each variation targets a different section of the large intestine, and doing all three maximizes the digestive benefit of the full pose.
Wind Relieving Pose Benefits for Digestion and Gas Relief
The wind relieving pose benefits for digestion are grounded in the mechanical effect of abdominal compression on intestinal motility, combined with the parasympathetic activation produced by the prone breathing position.
A study published in the Journal of Alternative and Complementary Medicine found that yoga interventions including supine compression poses produced measurable improvements in bloating, constipation frequency, and self-reported digestive comfort in adults with functional gastrointestinal disorders over an eight-week period. The abdominal compression component was identified as a contributing mechanism alongside breath regulation.
Digestive benefit is the most widely sought reason to practice this pose. But the benefits extend meaningfully beyond gas relief:
- Lumbar spine decompression: Drawing the knee toward the chest creates mild traction at the sacroiliac joint and gently opens the lumbar facet joints, reducing compression from prolonged sitting or standing.
- Hip flexor release: The iliopsoas and rectus femoris on the extended leg are passively lengthened as the pelvis tilts. This benefit is subtle in a single hold but accumulates across a regular practice.
- Sacroiliac joint mobility: The asymmetrical pressure of one thigh against the pelvis gently mobilizes the sacroiliac joint without the instability risk of active loaded movement.
- Parasympathetic activation: Stillness, breath focus, and gentle compression together signal the nervous system to shift toward its rest-and-digest mode. Cortisol levels drop. Digestion improves as a downstream effect.
- Abdominal organ massage: The liver, large intestine, and lower digestive tract all receive gentle mechanical stimulation through the thigh’s pressure.
How Wind Relieving Pose Affects the Digestive System
The wind relieving pose affects the digestive system through direct mechanical compression of the abdominal cavity, which applies external pressure to the large intestine and stimulates the movement of intestinal contents and trapped gas.
The large intestine follows a specific anatomical path: it begins at the lower right side of the abdomen as the ascending colon, crosses horizontally as the transverse colon, and descends on the left as the descending colon before curving toward the rectum. Trapped gas moves in this direction when peristalsis is working normally. When it stalls, bloating and discomfort follow.
Think of the large intestine like a garden hose that has been kinked in a few places. Gentle external pressure applied in the right sequence helps clear the kinks and restore flow. The single-knee Pavanamuktasana, practiced right then left, follows this anatomical direction when sequenced left side first through some classical lineages, beginning at the ascending colon and progressing toward the descending.
The breathing component amplifies this effect. During the hold, slow diaphragmatic inhalations increase intra-abdominal pressure from above while the thigh applies it from below. The release on the exhale drops that pressure, creating a pulsing compression-decompression rhythm that mechanically stimulates gut motility.
According to the National Center for Complementary and Integrative Health, yoga’s effects on the gastrointestinal system include both direct mechanical effects through abdominal compression poses and indirect effects through the parasympathetic nervous system, which governs the “rest and digest” state in which intestinal motility functions most efficiently.
Pose Tip:
- Breathe slowly during the hold, aiming for a 4-count inhale and a 4-count exhale
- On each exhale, gently increase the pressure of the thigh toward the abdomen
- On each inhale, maintain the position but soften the grip slightly
Wind Relieving Pose for Lower Back Pain
The wind relieving pose is one of the most frequently recommended supine poses for acute and chronic lower back tension because it gently flexes the lumbar spine, releases the quadratus lumborum, and reduces compression at the lumbar facet joints.
Lower back pain often involves a combination of muscle guarding in the erector spinae and quadratus lumborum, facet joint compression from prolonged lumbar extension (the natural curve of standing and sitting), and hip flexor tightness that pulls the pelvis into anterior tilt. This pose addresses all three simultaneously without loading the spine.
The single-knee version is particularly useful for people whose lower back pain is one-sided, which is common in sacroiliac joint dysfunction and piriformis tension. Drawing the knee on the affected side toward the chest gently mobilizes the sacroiliac joint while releasing the hip external rotators on that side.
Yoga teachers and physical therapists generally recommend beginning with the single-knee version when lower back pain is the primary concern. This allows the practitioner to assess each side independently and stop if one side produces discomfort that the other does not.
Safety note for back pain: if drawing either knee toward the chest produces radiating pain down the leg, tingling, or numbness, stop immediately. These symptoms may indicate nerve involvement rather than simple muscle tension. A healthcare provider experienced in musculoskeletal assessment can determine whether the pose is appropriate given those symptoms.
Modification for acute lower back pain: place a folded blanket under the sacrum before beginning. This slight elevation reduces the range of lumbar flexion required to bring the thigh toward the abdomen, making the pose accessible during flare-ups when full lumbar flexion is uncomfortable.
Key Takeaway: For lower back pain, start with the single-knee version on the more painful side, hold for 5 to 8 slow breaths, and place a folded blanket under the sacrum if full lumbar flexion feels sharp rather than releasing.
Wind Relieving Pose in Bikram and 26&2 Yoga
In the Bikram / 26&2 yoga system, Pavanamuktasana is known as Wind-Removing Pose and appears as pose number 12 in the floor series, following Savasana (Corpse Pose) after the standing series and preceding Sit-Up (Pada-Hasthasana in seated context).
The Bikram sequencing places this pose with clear left-right instruction: right knee first, then left knee, then both knees together. This is deliberate. The right knee first applies compression to the right lower abdomen, where the cecum and the beginning of the ascending colon are located. The left knee follows to address the descending colon. The bilateral version completes the sequence by compressing both sides simultaneously.
In a 105-degree Bikram room, this pose serves an additional function beyond digestion. After the intense standing series, the floor series begins with Savasana and then Wind-Removing Pose as the body’s first active supine shape. The temperature of the room means the muscles are already warm and pliable. The pose therefore achieves deeper hip flexor release than it would in a cool room at the same hold time.
Teachers trained in the 26&2 tradition cue students to press the chin toward the chest while holding the pose, creating gentle cervical flexion that lengthens the entire spine from sacrum to occiput. This cue is specific to the Bikram lineage and differs from most Hatha versions, which keep the head neutral on the floor.
Modification for Bikram beginners: if the chin-to-chest cue creates neck tension, keep the head flat on the floor. The abdominal compression and lumbar decompression benefits are fully present without the cervical component.
Wind Relieving Pose Modifications for Beginners
Wind relieving pose modifications for beginners address the most common physical barriers: tight hip flexors that prevent the thigh from reaching the abdomen, limited hand strength for gripping the shin, and difficulty keeping the extended leg on the floor.
For someone new to floor-based yoga, the pose may feel more effortful than it looks. The hip flexor on the raised leg is working to hold the thigh in position. The core is stabilizing the pelvis. The shoulders are resisting the pull to lift. These are all real demands that beginners experience before the muscles involved become accustomed to the shape.
To practice the beginner version of Pavanamuktasana (Wind-Relieving Pose):
- Lie on your back with knees bent and feet flat on the floor. This reduces the demand on the extended leg.
- Draw one knee toward the chest. Use a yoga strap looped around the back of the thigh if your hands cannot comfortably reach.
- Keep the opposite foot flat on the floor with the knee bent rather than extending the leg fully.
- Hold for 3 to 5 breath cycles, approximately 15 to 30 seconds.
- Release and switch sides.
This bent-knee starting position reduces the traction demand on the lumbar spine and makes the abdominal compression more achievable for bodies with limited hip flexor range of motion.
A yoga strap is genuinely useful here, not a sign of limitation. Using a strap allows you to maintain the hold without gripping the shin so tightly that the arms fatigue before the digestive and lumbar benefits have time to develop.
Wind Relieving Pose for Seniors and Limited Mobility
Wind relieving pose is particularly well-suited for older adults because it requires no weight-bearing on the joints, no balance challenge, and no standing strength. Practiced on the floor or adapted for a chair, it remains accessible through most stages of mobility decline.
The Arthritis Foundation recognizes gentle supine yoga poses as appropriate for adults managing osteoarthritis and joint stiffness, noting that non-weight-bearing movement maintains joint range of motion without the compressive load that aggravates inflamed joint surfaces. Pavanamuktasana fits this description precisely.
For seniors with limited floor mobility, the chair adaptation works well:
- Sit upright in a firm chair with both feet flat on the floor.
- Draw one knee upward toward the chest, holding behind the thigh with both hands.
- Apply gentle pressure, pulling the thigh toward the torso without forcing the knee past the hip joint.
- Hold for 4 to 6 breath cycles, approximately 25 to 40 seconds.
- Release the foot back to the floor slowly. Repeat on the other side.
This chair version produces meaningful hip flexor release and gentle abdominal stimulation without requiring the practitioner to get down to or up from the floor, which is the most common barrier for seniors.
For seniors practicing the floor version, place a folded blanket under the head and a second one under the sacrum. Both additions reduce the range of spinal flexion required and make the position comfortable enough to hold long enough for the therapeutic effect to develop.
Pose Tip:
- Seniors with hip replacements should confirm with their orthopedic surgeon which degree of hip flexion is safe before practicing any version of this pose
- Keep movements slow and controlled when entering and exiting the pose
- The chair version is equally therapeutic and not a lesser alternative
Key Takeaway: For seniors, the chair adaptation of wind relieving pose delivers real hip flexor release and digestive stimulation without requiring floor access. Use two folded blankets if practicing on the floor: one under the head and one under the sacrum.
Wind Relieving Pose During Pregnancy: What Is Safe
Pavanamuktasana during pregnancy requires trimester-specific modification because direct abdominal compression is contraindicated once the uterus has expanded beyond the first trimester.
In the first trimester, the standard version of the pose is generally appropriate for most pregnant practitioners, provided there are no complications such as subchorionic bleeding, threatened miscarriage, or other conditions that a midwife or obstetrician would flag as reasons to avoid abdominal pressure. At this stage, the uterus remains within the pelvis and the abdominal compression of the thigh does not reach the uterus.
In the second and third trimesters, direct compression of the abdomen is not appropriate. The growing uterus fills the abdominal cavity, and pressure from the thigh applies force directly to the uterine wall. This is not safe practice. A modified version focuses on hip flexor release without abdominal compression:
- Lie on your side rather than your back (supine positioning in late pregnancy also reduces inferior vena cava compression).
- Draw the top knee toward the chest, supporting it with a bolster or pillow between the knees.
- Hold for 4 to 6 breaths, focusing on the hip flexor release without pressing the thigh against the abdomen.
The side-lying version maintains the hip flexor benefit that pregnant practitioners need for sciatic nerve tension and lower back support without any compression risk.
Any pregnant individual with a history of preterm labor, placenta previa, or cervical insufficiency should discuss yoga practice including supine poses with their maternity care provider before continuing.
Wind Relieving Pose Contraindications and When to Skip It
The wind relieving pose contraindications are clear and worth knowing before practice, because several common conditions make this pose inappropriate in its standard form.
Absolute contraindications include:
- Active abdominal hernia: Any hernia of the abdominal wall, inguinal or umbilical, means external abdominal pressure should be avoided entirely. The compression in this pose can worsen a hernia.
- Recent abdominal surgery: Within 6 to 8 weeks of abdominal surgery, including cesarean section, laparoscopy, or appendectomy, no compression of the abdominal wall should be applied.
- Recent hip replacement: The degree of hip flexion in this pose may exceed safe post-surgical range of motion limits depending on the surgical approach used.
- Second and third trimester pregnancy: As described in the preceding section.
- Severe knee injuries: If the knee cannot flex comfortably to 90 degrees or beyond, gripping the shin places compressive force on a compromised joint structure.
Relative contraindications where modification may allow safe practice:
- Acute lower back disc herniation with radiculopathy: If the pose produces leg symptoms, stop. If it produces only local back sensation that does not worsen, the modified blanket-supported version may be appropriate with guidance from a physical therapist.
- Inflammatory bowel disease during a flare: Abdominal compression during an active flare of Crohn’s disease or ulcerative colitis may worsen discomfort. Avoid during flares; return to the pose during remission.
- Osteoporosis: Lumbar flexion in this pose is mild, but those with severe osteoporosis should confirm safe range of spinal flexion with their healthcare provider.
How Long to Hold Wind Relieving Pose for Best Results
Most yoga teachers recommend holding the wind relieving pose for 5 to 8 breath cycles per side, which translates to approximately 30 to 50 seconds at a normal breathing pace, to achieve meaningful digestive stimulation and lumbar decompression.
Hold duration is not one-size-fits-all. It depends on your goal and your experience level. For gas relief, longer holds (8 to 10 breaths) give the intestinal wall more time to respond to the compression-release rhythm. For lower back release, 5 to 8 breaths is generally sufficient. For seniors or beginners, starting with 3 to 5 breaths and building from there prevents overexertion.
| Goal | Recommended Hold | Breath Count | Experience Level |
|---|---|---|---|
| Gas and bloating relief | 40 to 60 seconds | 6 to 10 breaths | All levels |
| Lower back decompression | 30 to 45 seconds | 5 to 8 breaths | All levels |
| Hip flexor release | 45 to 60 seconds | 7 to 10 breaths | Intermediate |
| General relaxation | 30 to 40 seconds | 5 to 7 breaths | Beginners |
| Bikram / 26&2 sequence | 60 seconds per side | 10 breaths | Intermediate to advanced |
| Chair adaptation for seniors | 25 to 40 seconds | 4 to 6 breaths | All levels |
A study published in the International Journal of Yoga found that sustained supine abdominal compression holds of 30 seconds or more produced greater self-reported relief from bloating and lower abdominal discomfort than shorter holds of 10 to 15 seconds. Consistency across multiple sessions mattered more than any single session’s duration.
The practical takeaway: hold long enough to complete at least 5 slow, full breaths. Anything shorter shortchanges both the digestive and the musculoskeletal benefits.
Key Takeaway: Hold each side for at least 5 full breaths, or roughly 30 to 45 seconds. Anything shorter reduces both the digestive stimulation and the lumbar decompression to a level where the pose delivers very little benefit.
Wind Relieving Pose vs Related Supine Poses
The wind relieving pose is one member of a family of supine compression and release poses, each with a distinct effect and appropriate use case. Understanding the differences helps you choose the right pose for your specific need.
Apanasana (Knees-to-Chest Pose) is the closest relative. Both draw the knees toward the abdomen in a supine position. The difference is that Apanasana typically involves rocking gently from side to side or forward and backward, creating a dynamic massage effect rather than sustained compression. Apanasana is less specific to digestion and more focused on gentle lumbar rocking as a warm-up or cool-down shape.
Ananda Balasana (Happy Baby Pose) draws the knees wide apart toward the armpits rather than inward toward the abdomen. This shifts the primary target from abdominal compression to hip external rotation and inner groin release. Happy Baby is not a gas-relief pose in the same mechanical sense. It produces hip joint opening, not intestinal compression.
Supta Matsyendrasana (Supine Spinal Twist) crosses the bent knee over the body to create a rotational stretch of the lumbar spine and thoracic spine. It does not compress the abdomen. It is better suited for spinal mobility and lateral hip release than for digestive stimulation.
| Pose | Sanskrit Name | Primary Action | Best For | Abdominal Compression |
|---|---|---|---|---|
| Wind-Relieving Pose | Pavanamuktasana | Straight compression into abdomen | Gas, bloating, lumbar decompression | Yes, direct |
| Knees-to-Chest | Apanasana | Dynamic rocking | Lumbar massage, warm-up | Mild, intermittent |
| Happy Baby | Ananda Balasana | Hip external rotation | Hip opening, groin release | Minimal |
| Supine Twist | Supta Matsyendrasana | Spinal rotation | Spinal mobility, lateral hip | None |
Yoga Sequence for Gas Relief and Digestive Comfort
A yoga sequence for gas relief works by combining abdominal compression, spinal twists, and diaphragmatic breathing to progressively stimulate intestinal motility and parasympathetic activation.
The following sequence is designed for home practice on a yoga mat. It takes approximately 15 to 20 minutes and can be practiced morning, evening, or anytime digestive discomfort arises. Practice on an empty stomach or at least two hours after a full meal.
Complete sequence for gas relief and digestive comfort:
- Savasana (Corpse Pose): Lie flat for 10 breaths. Allow the nervous system to shift out of sympathetic activation. Digestion improves only when the body is in parasympathetic mode.
- Apanasana (Knees-to-Chest Pose), dynamic: Draw both knees toward the chest. Rock gently from side to side for 8 to 10 slow breaths. This warms the lumbar and begins abdominal stimulation.
- Pavanamuktasana (Wind-Relieving Pose), right knee: Hold 6 to 8 breaths. Press thigh gently into the right lower abdomen on each exhale.
- Pavanamuktasana (Wind-Relieving Pose), left knee: Hold 6 to 8 breaths. Apply the same exhale-compression pattern.
- Pavanamuktasana (Wind-Relieving Pose), both knees: Hold 6 to 8 breaths. Allow the full lower abdomen to receive bilateral compression.
- Supta Matsyendrasana (Supine Spinal Twist), right: Bring the right knee across the body while extending the right arm out. Hold 6 breaths. This rotates the transverse colon.
- Supta Matsyendrasana (Supine Spinal Twist), left: Mirror on the left side. Hold 6 breaths.
- Ananda Balasana (Happy Baby Pose): Hold 5 to 8 breaths to release hip external rotators after the compression sequence.
- Savasana (Corpse Pose): Final rest for 2 to 3 minutes. The digestive response to compression and twisting continues after the physical movement stops.
Modification for seniors or those with limited floor mobility: perform steps 3, 4, and 5 in the chair version described in the seniors section, and skip steps 6 and 7 or replace them with seated gentle torso rotation in the chair.
Frequently Asked Questions About Wind Relieving Yoga Pose
What does the wind relieving pose actually do for your body?
Pavanamuktasana (Wind-Relieving Pose) compresses the large intestine to stimulate intestinal motility, helping move trapped gas along the digestive tract and reducing bloating.
It also gently decompresses the lumbar spine by drawing the knee toward the chest, releasing tension in the quadratus lumborum and erector spinae.
The held breath pattern during the pose activates the parasympathetic nervous system, supporting the rest-and-digest state that allows digestion to function more efficiently.
Should I do the left knee first in wind relieving pose?
Starting with the left knee follows the anatomical direction of the large intestine, moving from the descending colon toward the rectum.
Some Hatha teachers prefer right knee first, targeting the ascending colon initially; the Bikram tradition teaches right knee first for different anatomical reasons.
Either sequencing delivers benefit. Consistency matters more than which side you begin on. Pick one order and stay with it each session.
How long should I hold wind relieving pose to relieve gas?
Hold each side for 5 to 8 breath cycles, roughly 30 to 50 seconds, for meaningful digestive stimulation.
A study published in the International Journal of Yoga found that holds of 30 seconds or more produced greater self-reported relief from bloating than shorter holds of 10 to 15 seconds.
For stronger gas relief, extend the hold to 8 to 10 breaths and apply gentle additional pressure on each exhale.
Can I do wind relieving pose if I have lower back pain?
Yes, in most cases the wind relieving pose is appropriate for lower back pain and is frequently recommended by physical therapists for lumbar decompression.
If drawing the knee toward the chest produces radiating pain, tingling, or numbness down the leg, stop and seek assessment from a musculoskeletal specialist before continuing.
Use a folded blanket under the sacrum to reduce the degree of lumbar flexion required if the standard version feels sharp rather than releasing.
Is wind relieving pose safe during pregnancy?
The pose is generally appropriate in the first trimester for uncomplicated pregnancies, before the uterus has expanded into the abdominal cavity where compression would apply.
From the second trimester onward, direct abdominal compression is not safe. Use the side-lying modification with a bolster between the knees instead.
Any pregnant individual with pregnancy complications should discuss yoga practice with their midwife or obstetrician before continuing with any supine or compression poses.
Practice It Tonight, Not Tomorrow
Start with the single-knee version on your right side, hold for five slow breaths, switch to the left, then bring both knees together. That is the complete core practice in under five minutes.
If lower back tension is your reason for being here, add the folded blanket under the sacrum and extend each hold to eight breaths. If digestion is your focus, follow the full 15-minute sequence laid out in the final section.
This pose works best when practiced regularly. Three to four times per week, even outside of a full yoga session, builds the kind of consistency that produces real and lasting digestive and lumbar relief.